A good many of us are naturally drawn to certain types and styles of homes. For some, these preferences may change, evolve, or be added to throughout the course of our lives.
Whether we are fortunate to ever have the opportunity to live in one of our dream homes or not, the interest and passion we have in the styles that appeal most to us often influence our worlds in myriad ways.
There are a number of different architectural styles of homes that resonate deeply with me. Chief amongst of which are most dwellings from the 18th, 19th, and early to mid-twentieth centuries.
I am also especially keen on rustic log cabins, elegant modern apartments + condos, just about anything with goth notes to it, and cottages of many types from around the world.
Long before terms such as #cottagecore, #darkcottagecore, #witchcore, and #fairycore had been invented (let alone turned into the social media darlings that they have become in recent years), I went weak in the knees for cottages – be they sweet and chipper or dark and broodingly mysterious.
To date, I have not had the pleasure of living in a cottage of any type myself. However, dear friends of mine – Lindsay and Jonas from the wonderful blog + YouTube channel + Instagram account, It’s a Charming Life – are blessed to reside in a cottage that sits alongside a yesteryear cemetery.
For a history-loving, cottage adoring, hardcore taphophile like myself, their abode is a dream home for me. And, I have no doubt, scores of others around the globe as well. 🥰
I have been greatly inspired by the cozy, whimsical, beautiful, and – as their online presence’s name implies – thoroughly charming world that these two sweet souls have lovingly created for several years now.
Also spanning multiple years is the wonderful snail mail correspondence that Lindsay and I have had the pleasure of sharing.
As 2021 started to wind down, but before we had become fully enmeshed into winter again, a mighty spark of creative inspiration struck me.
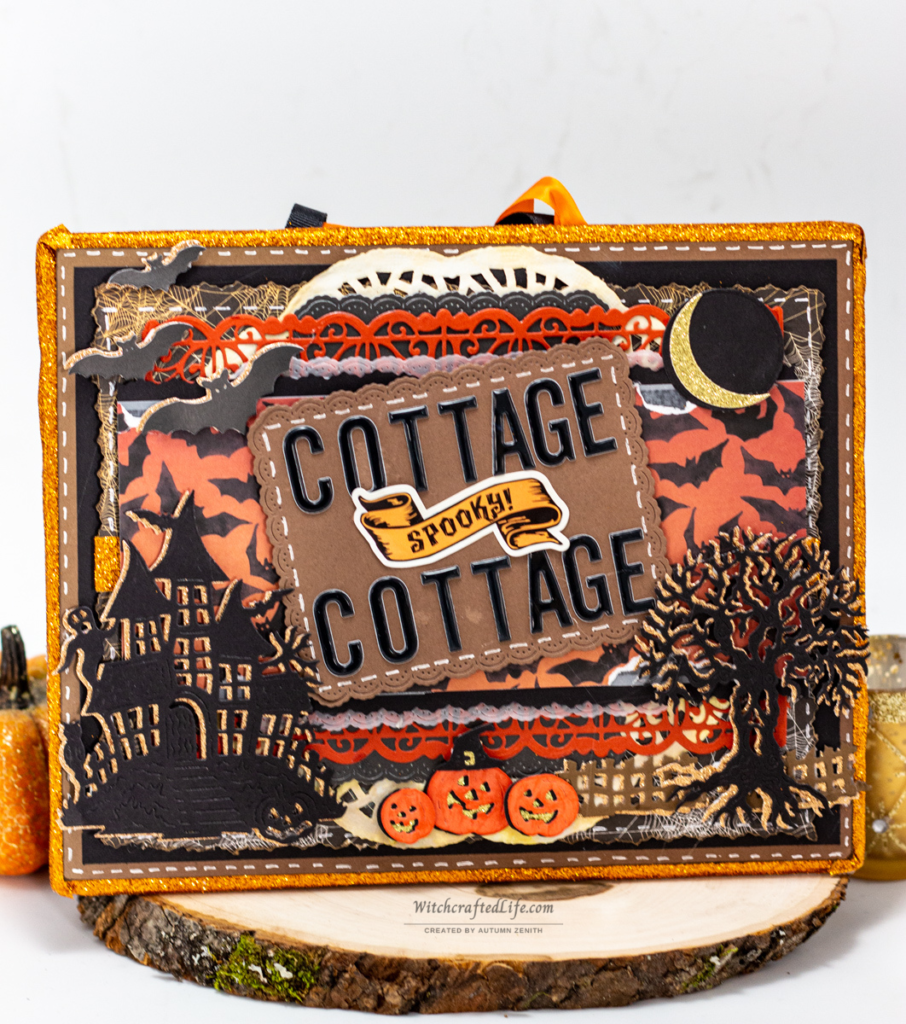
I knew instantly that I wanted to make a paper crafting project for Lindsay and her husband, Jonas, that celebrated not only the fact that they live in one of the most adorable cottages around but also their equally fantastic personal style which taps into many of my own favourite aesthetics.
Setting to work immediately, I went to my wee stash of chipboard and cardboard that I save from various types of packaging to use on craft projects.
A piece measuring roughly 9 7/8th inches wide x 7 3/4th inches tall felt like a terrific size for the hanging wall sign that I was envisioning in my mind.
Thinking not only about Linday and Jonas’s own passion for Halloween, but also the colour palette and vintage-meets-whimsical-meets-cottagecore style of their home décor, I set off on a creative flurry and scarcely moved from my office chair until this delightful All Hallows’ themed hanging wall sign was complete. 😊
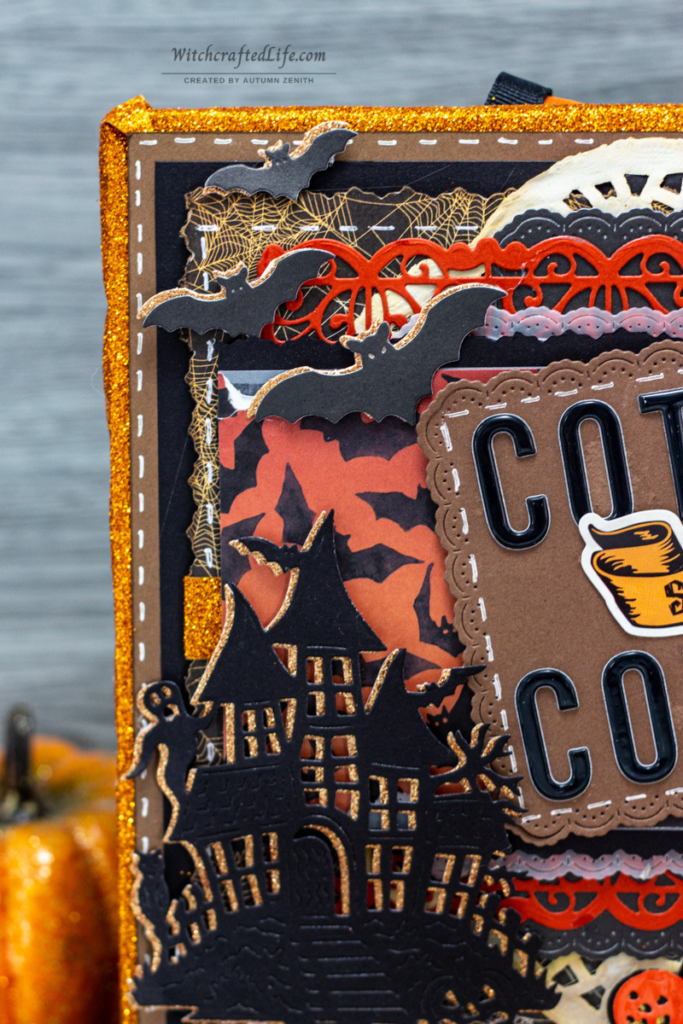
I then photographed it, securely wrapped it up for posting, and mailed it out to Lindsay and Jonas as a Yule / Christmas gift once December returned (along with the Gothic Haunted Christmas Tree Card that I shared here last month).
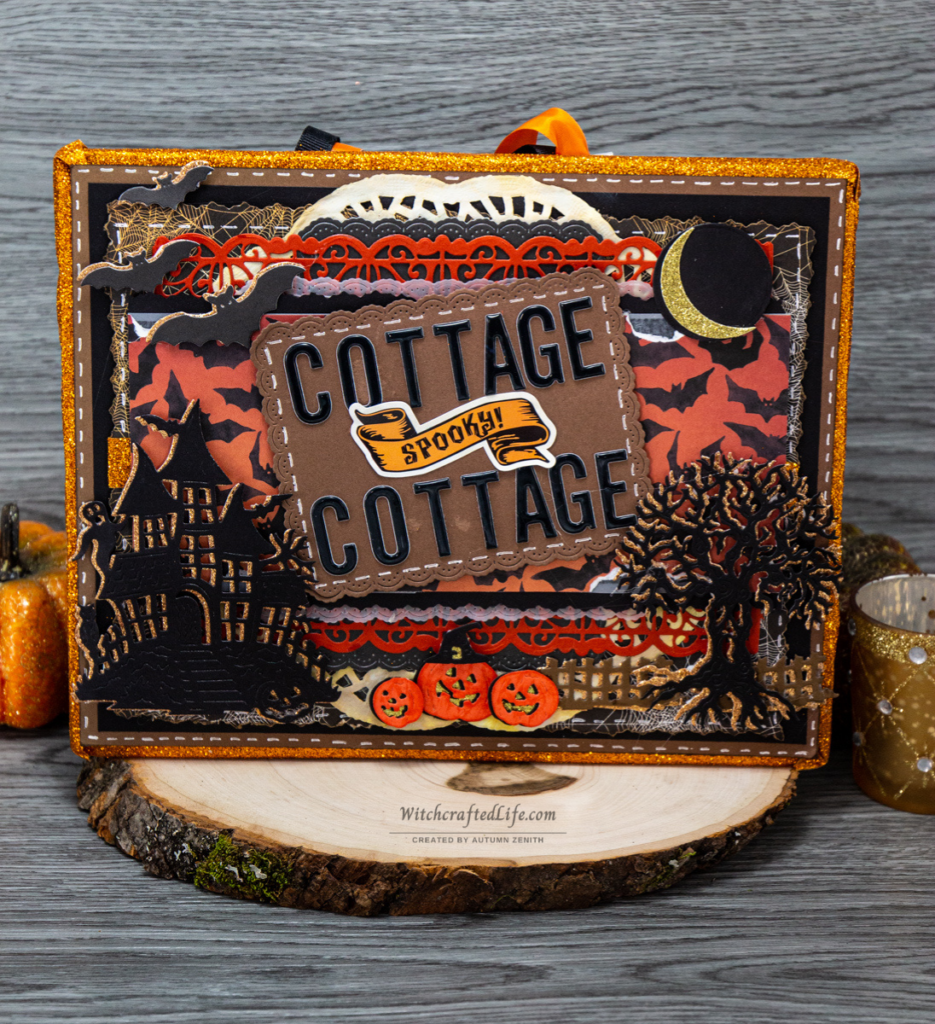
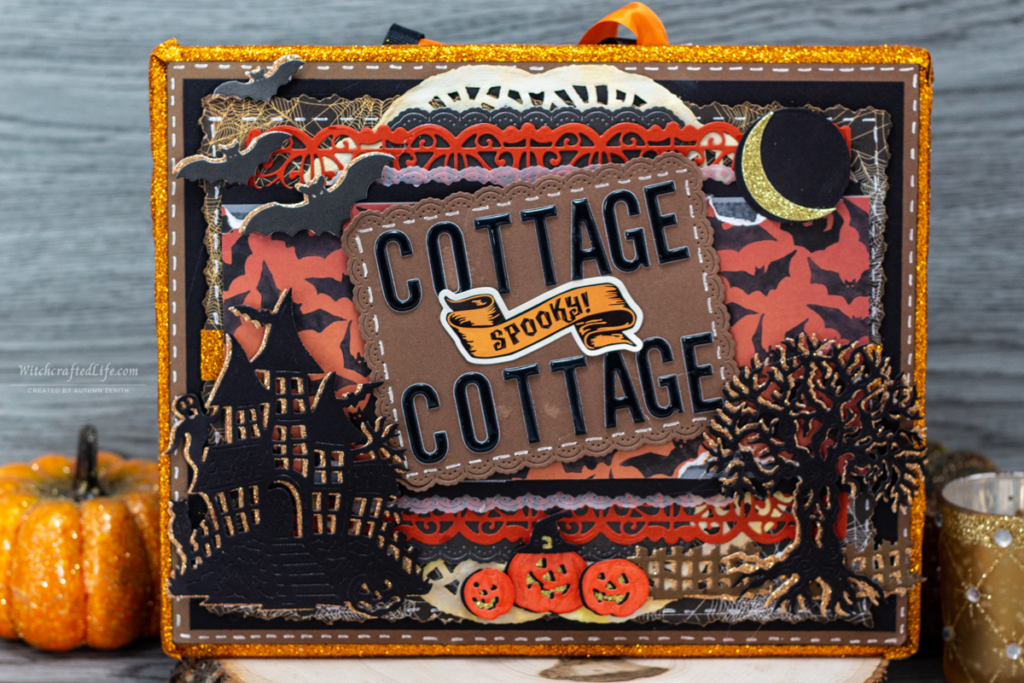
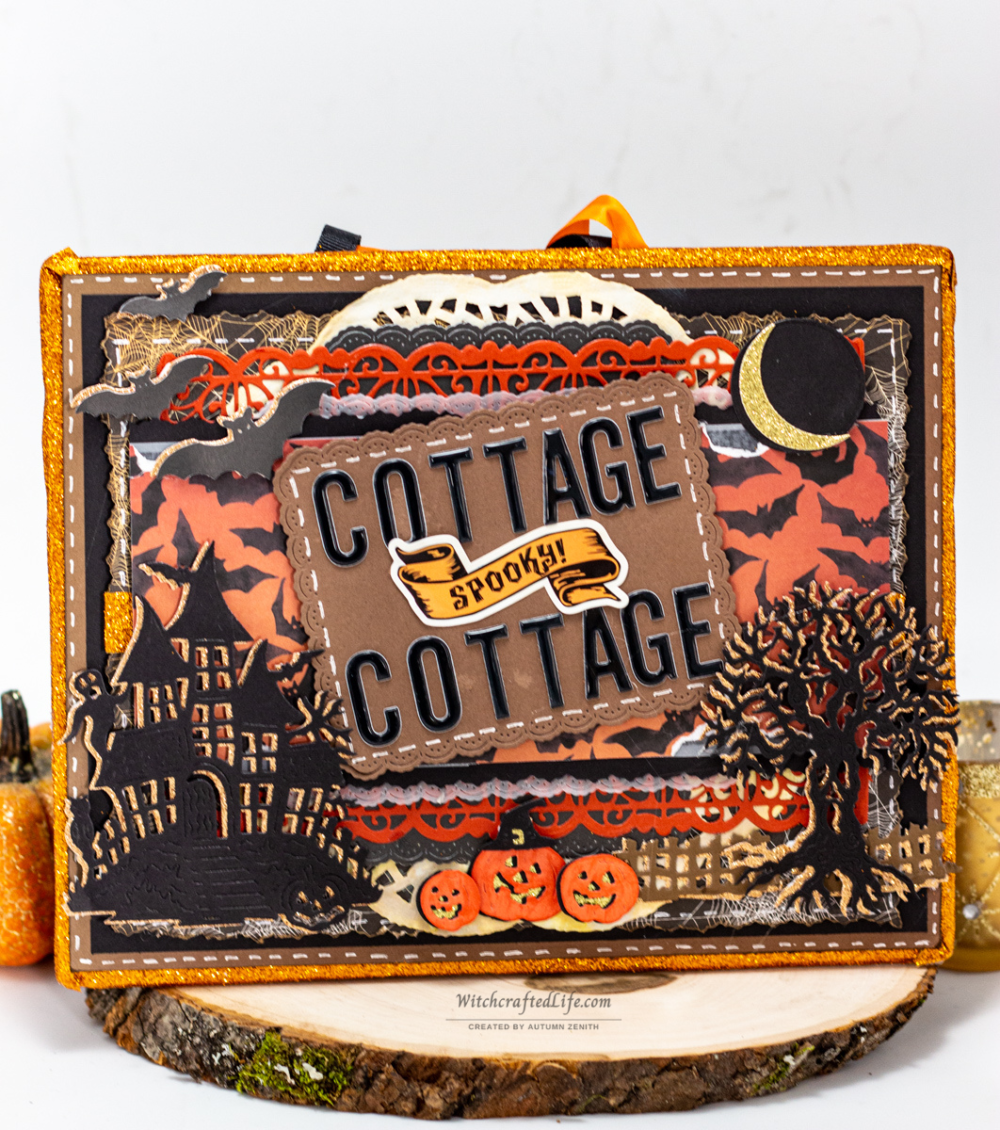
Cottage Spooky Cottage detailed Halloween Scene Hanging Wall Sign
Making cards and various other types of paper crafting gifts for friends, family members, neighbours, and others is one of my favourite elements of this awesome art form.
Naturally, I am far from alone on this front and creative folks of countless kinds likewise adore giving their finished projects away.
In fact, often the greater I love a completed project, the more eager and joyful I am to present it to someone else.
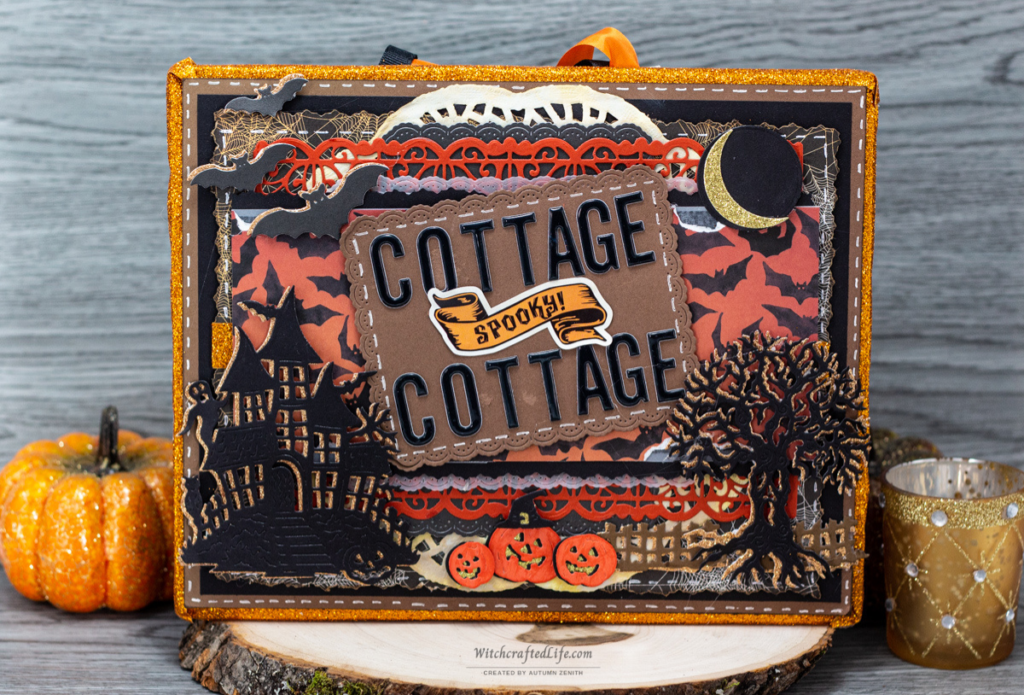
That was the case with this festive Halloween themed wall hanging (which is my latest contribution to the #MakeHalloween hashtag that I created and launched last year – and which I enthusiastically welcome you to use for any and all of your own Halloween / Samhain related creative projects, too.)
I began with a piece of plain (kraft coloured) cardboard for the base of this hanging sign. If you did not have any suitable cardboard to hand, very study chipboard, a lightweight canvas, or even a suitable piece of wood could be used instead.
If opting for wood (or any other material that is apt to be acidic), I would coat it with an archivally safe preservative spray, lacquer or similar product to help prevent the natural acids in the material of the project base from potentially damaging, over time, the materials you put on top of it.
Speaking of guarding things, I wanted to protect the side edges of this sign. As it was, after all, made with a cardboard base, not a canvas or wooden one.
To do so, I ran strips of orange sparkly adhesive craft tape (aka, adhesive ribbon) around all four sides.
I then set about creating layer after layer of Halloweeny goodness atop this versatile flat surface.
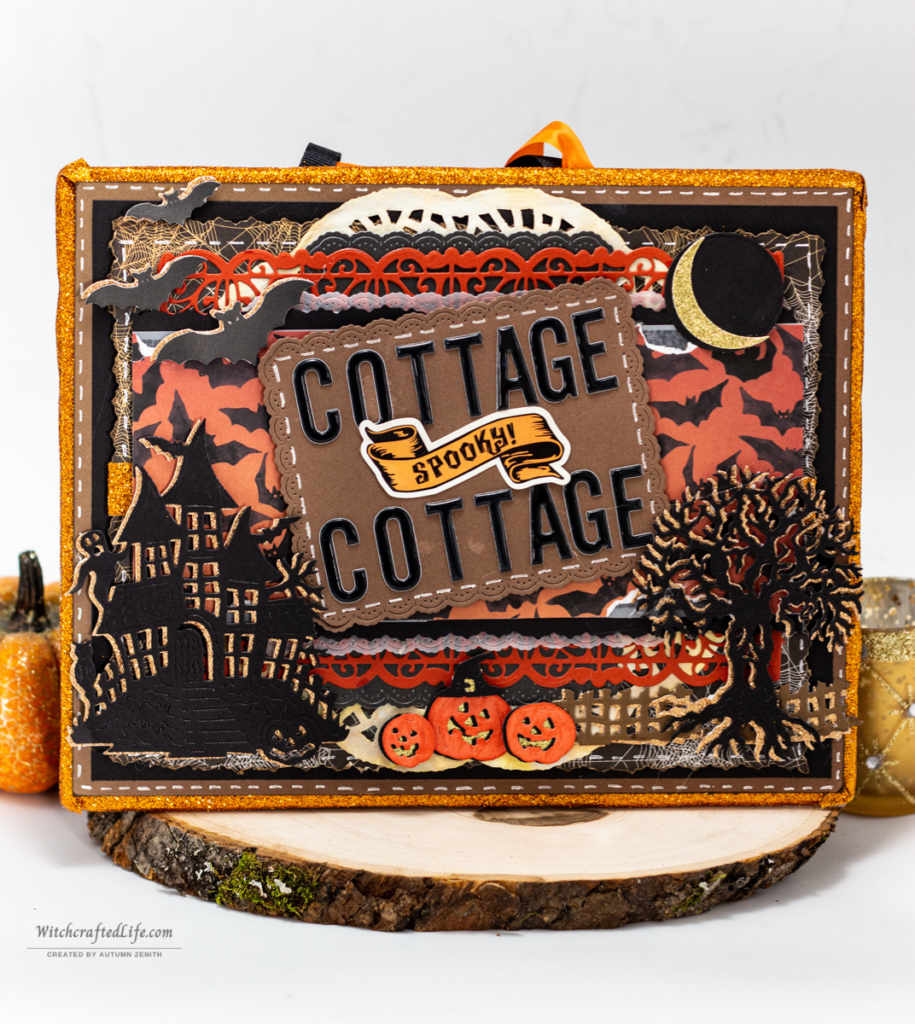
A surface which I looked at less like I would handmade card and more like a slightly scaled-down version of a scrapbook page (of the standard and widely used 12” x 12” or 8.5” x 11” sizes, that is).
As touched on above, Lindsay and Jonas are fellow Halloweenoholics and – much as at my and Tony’s home – they incorporate some elements of fall and October 31st into their year-round décor.
I do not know whether they will opt to display this hanging wall sign all year or bring it out annually as summer starts to fade. Either way, I went with colours and themes that I felt would suit their fabulous cemetery adjacent cottage the whole year through.
A fair bit of die cutting went into this project, but there was nothing difficult about that aspect – nor any other – of this sign’s design.
The hours spent bringing it to life were amongst the most enjoyable of 2021 for me and when all was said and done, I was thrilled with the end result of this spookytastically charming hanging wall sign.
Since the start of 2021, I have been using a small (very basic/entry-level) lightbox to take photos of most of my paper crafting projects in.
The dimensions of this wall sign coupled with the size of both my lightbox and the lens on my camera, made photographing this project a bit tricky. This is why the background is white in some and woodgrain in others (I kept trying to find backgrounds to use in the lightbox that worked without showing their edges in these shots).
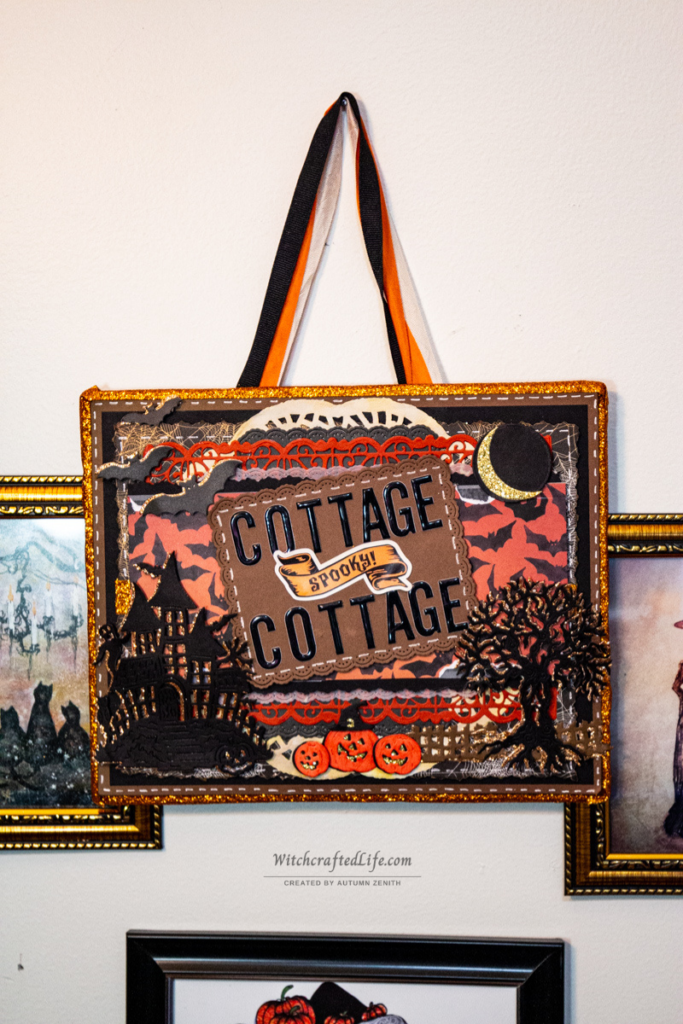
To showcase this handmade Halloween sign on the wall, I took down some of the art from a wall in my crafty space, placed the sign up, and nabbed a couple of (very low light) pics of it hanging there.
If you would like to create a similar project – or simply take some general notes of inspiration from this one – please read on for a complete list of materials used and detailed step-by-step project instructions.
Products used to make this wonderful festive Halloween hanging wall sign
-Sturdy piece of cardboard (Measuring approx. 9 7/8th inches wide x 7 3/4th inches tall)
-Black cardstock
-A slightly lighter shade of black cardstock (or use very dark grey charcoal cardstock instead)
-Medium brown cardstock
-Light to light-medium brown cardstock
-Dark orange (or terracotta coloured) cardstock
-Gold glitter cardstock – Glittersilk Cardstock from Darice
-Copper glitter cardstock – Glittersilk Cardstock from Darice
-White vellum
-Black and white spiderweb print paper – Haunted House Ghastly Words paper from Carta Bella
-Orange and black pat print paper – Halloweeny 12” x 12” paper pad from Recollections
-Good sized scalloped edge square or rectangle die
-Elegant decorative border die (or punch)
-Three small, slightly different sized flying bat dies
-Full and crescent moon dies (a basic circle die or punch can easily be used for the full moon shape)
-Haunted house die
-Spooky (haunted) tree die
-Rickety fence die
-Three small, slightly different sized jack-o-lantern dies
-Small witch’s hat die (you could also use a witch’s hat sticker or premade die cut shape here instead)
-Decorative edge scissors – Heartbeat Paper Edgers Scissors from Fiskars
-Good sized white or cream paper doily
-Dark orange ink – Memento Morocco Ink from Tsukineko
-Deep golden yellow/honey coloured ink – Distress Oxide Ink in Wild Honey from Tim Holtz (Note that anywhere Distress Oxide In is used on this project, you can sub in regular Distress Ink instead.)
-Aged golden-brown ink – Distress Oxide Ink in Antique Linen from Tim Holtz
-Golden-y brown ink – Memento Toffee Crunch Ink from Tsukineko
-Dark brown ink – Memento Rich Cocoa Ink from Tsukineko
-Medium brown ink – Distress Oxide Ink in Brushed Corduroy from Tim Holtz
-White gel pen – Uniball White Ink Gel Pen from Signo
-Black alpha stickers – Weekend Black Letter Stickers from American Crafts
-“Spooky” word sticker – Trick or Treat by Steven Duncan Element Stickers from Carta Bella
-Adhesive orange glitter ribbon/trim (Crafter’s Square brand from Dollar Tree)
-3/8th inch wide black grosgrain ribbon (or another type of black ribbon or seam binding of your choice)
-Off-white or cream ribbon or seam binding
-Orange ribbon or seam binding
-(Optional) stapler and staples to adhere the ribbon “hanger” layers together
-Dimensional foam, pop dots, or similar to elevate some of your layers
-Adhesive, such as a tape runner, of your choice (I often use my Scotch Tape Glider)
How to make a Cottage Spooky Cottage hanging wall sign for fall / Halloween
Begin by sourcing or cutting down a piece of sturdy, but not too heavy, cardboard to use for the base of this project.
Next, cover the front of the sign with a piece of medium brown cardstock the same size as the cardboard piece itself and ink all four sides (edges) with dark brown ink. Adhere in place.
Cut (one at a time) pieces of sparkly orange adhesive trim and stick them down on all four sides of the cardboard base.
If you do not have a similar product to hand (I picked this up at Dollar Tree two or three autumns ago), you could use things such as very sturdy washi tape, orange duct tape, glittery ribbon, or even pieces of glitter cardstock.
Using a ruler and white gel pen, draw a border of stitches around the outermost edges of the brown piece of cardstock on the front of the sign.
Next, cut a piece of dark black cardstock a little bit smaller than the brown cardstock layer and adhere it to the brown cardstock.
Take a piece of spiderweb print paper and cut it a touch smaller than the previous layer using decorative edge scissors (or a suitable border punch, if you prefer).
Ink the edges of this piece of paper with Wild Honey Distress Oxide Ink (or a similar colour of ink or felt pen/marker). Then, using a ruler and white gel pen again, draw a line of stitches around the perimeter of this piece of cobweb print paper. Adhere to the previous layer.
Select a suitable premade doily or die cut one from white or cream coloured cardstock. Lightly ink the edges with the same Distress Oxide ink used in the previous step.
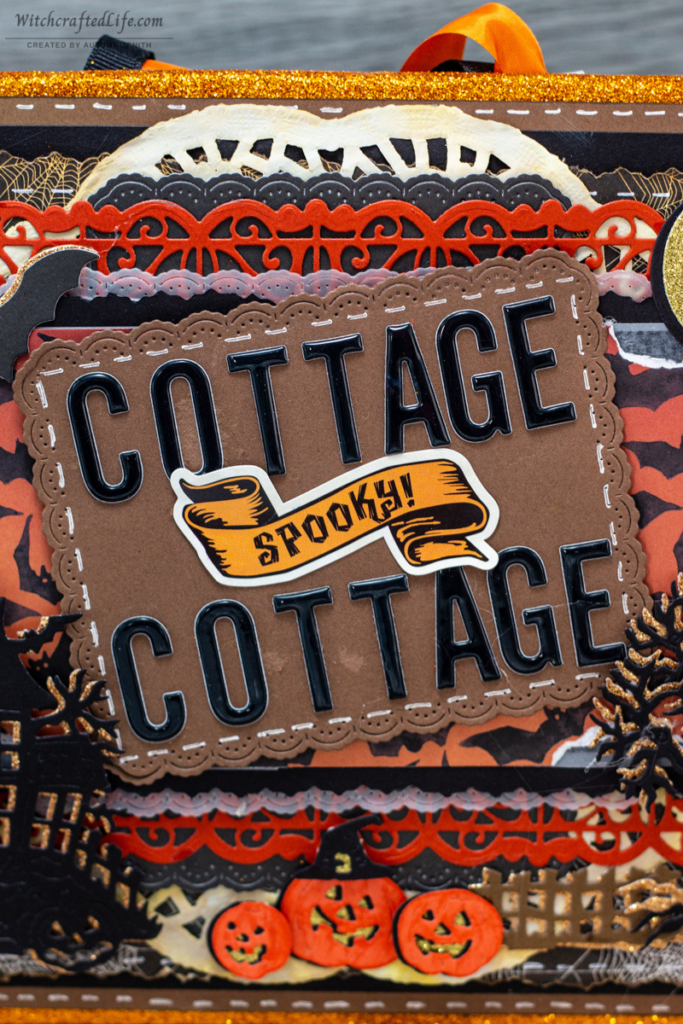
If it is not long enough to span the length of the center portion of the sign, cut it in half and adhere one half near the top and the other half of the doily near the bottom of the sign, as shown.
Die cut either a scalloped edge rectangle or square from light black (or charcoal grey) cardstock. Likewise, if it is not long enough to span the length of the center portion of the sign, cut it in half and adhere one half atop each half of the doily.
Using dark orange cardstock, die cut two decorative edge pieces or use a border punch to create something similar looking.
Position each orange decorative edge piece atop the black scalloped pieces that you created in the step above. Adhere in place.
Next, die cut a piece of vellum using the scape scalloped edge rectangle or square-shaped die. Adhere so that it overlaps part of the orange decorative edges (again, if needed, cut in half and adhere on half to the top and the other to the bottom central area of the sign).
Take a piece of dark black cardstock and using the same decorative edge scissors that you used on the spiderweb print paper, cut this piece a little bit smaller than the central layers that you’ve created so far. Adhere.
Cut and then rip, or simply rip to begin with, a piece of orange and black print paper. Back the top and bottom of this piece with a piece of vellum so that the edges of both pieces align at the top and bottom of the paper/vellum. Adhere together and then to the base layers.
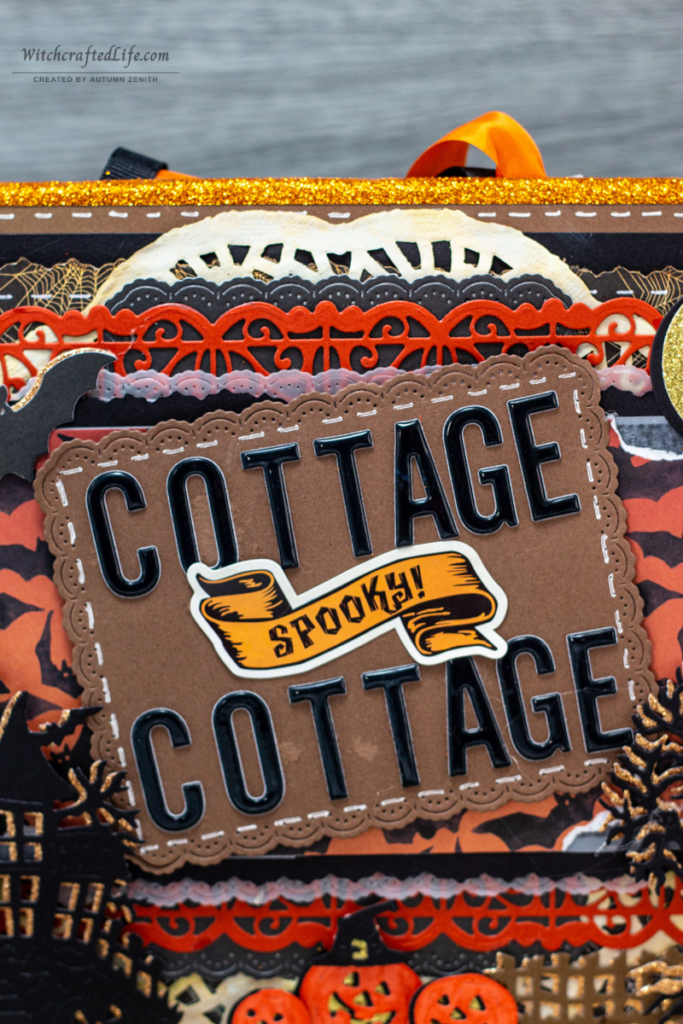
Using the same medium brown coloured cardstock as the very beginning base layers (front and back), die cut a scalloped edge square or rectangle. Using a ruler and white gel pen, draw a line of stitches around the edge of this cardstock panel.
Back the panel with dimensional adhesive (foam square, pop dots, etc) and position it at an angle ever-so-slightly higher than the center of the sign, as shown.
Use the alphabet stickers and “Spooky” sticker to spell out the words “Cottage Spooky Cottage” (or the phrasing of your choice that is able to fit in the space of the brown cardstock panel).
Next, it is time to roll up our sleeves and get to work with (more) die cutting.
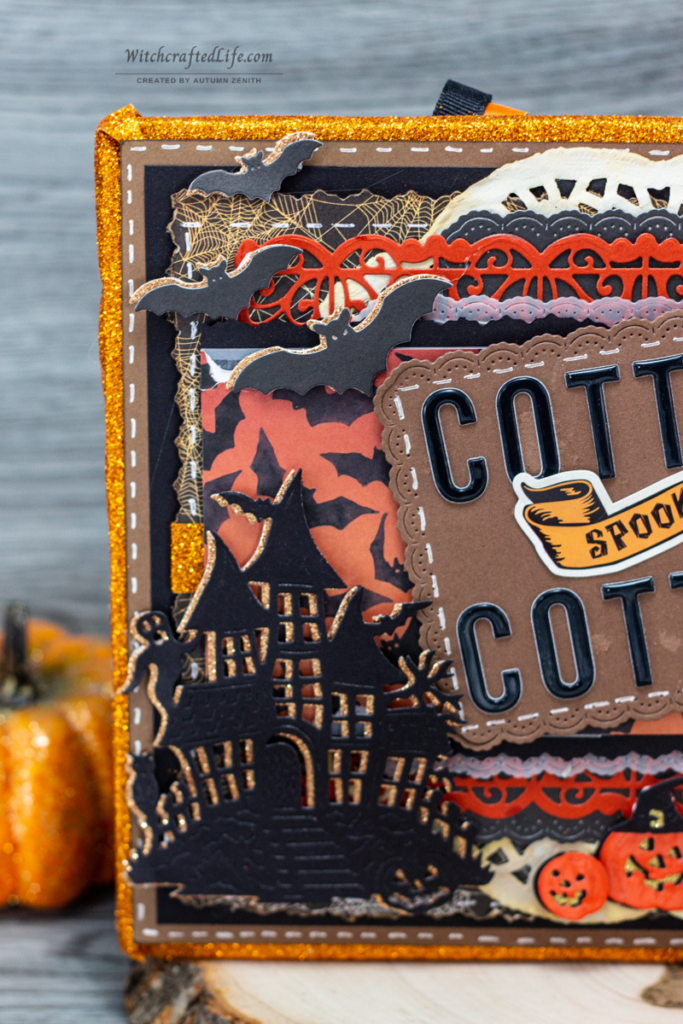
Using both light black (or charcoal grey) cardstock and copper glitter cardstock, die cut one layer apiece for three different-sized bats. Adhere together and position on the upper lefthand side of the sign.
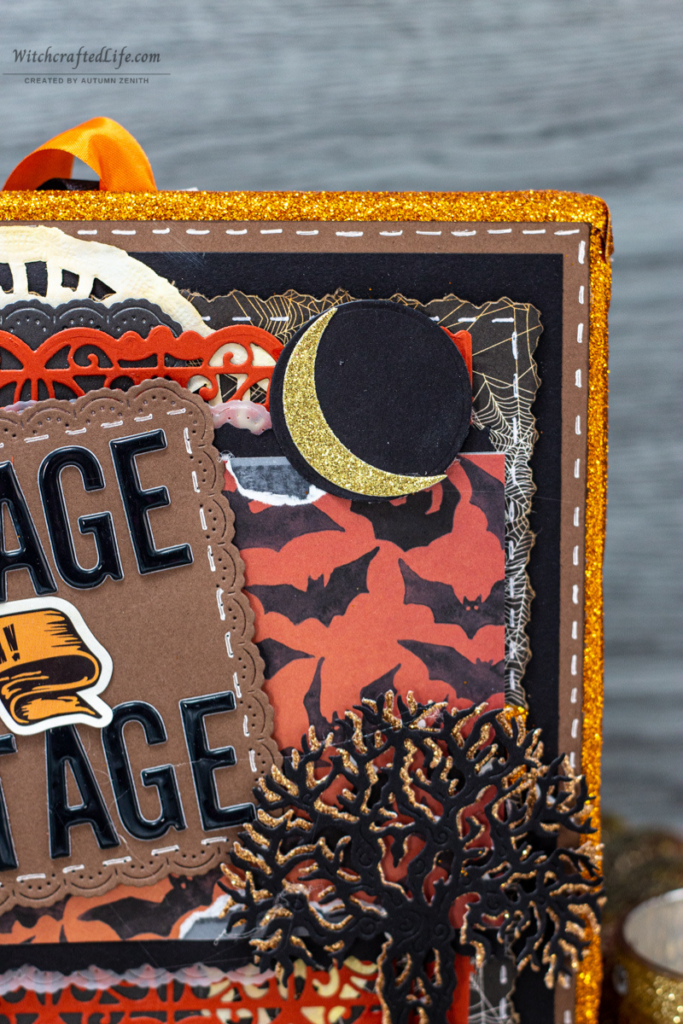
Die cut a full moon (circle-shaped piece) from dark black cardstock and a slender crescent moon piece from gold glitter cardstock. Adhere together and position towards the upper right-hand corner of the sign.
Take light to medium brown hued cardstock (ideally a lighter shade than the medium brown cardstock used elsewhere on this project) and copper (or gold, as you wish) glitter cardstock and die cut a rickety fence shaped piece from both cardstocks.
Use Brushed Corduroy Distress Oxide Ink on the edges and grooves of the brown fence layer, then adhere both layers together and adhere this pair to the lower righthand side of the central portion of the sign, as shown.
Die cut two haunted houses and two spooky trees, one each from black and glittery copper cardstock, respectively.
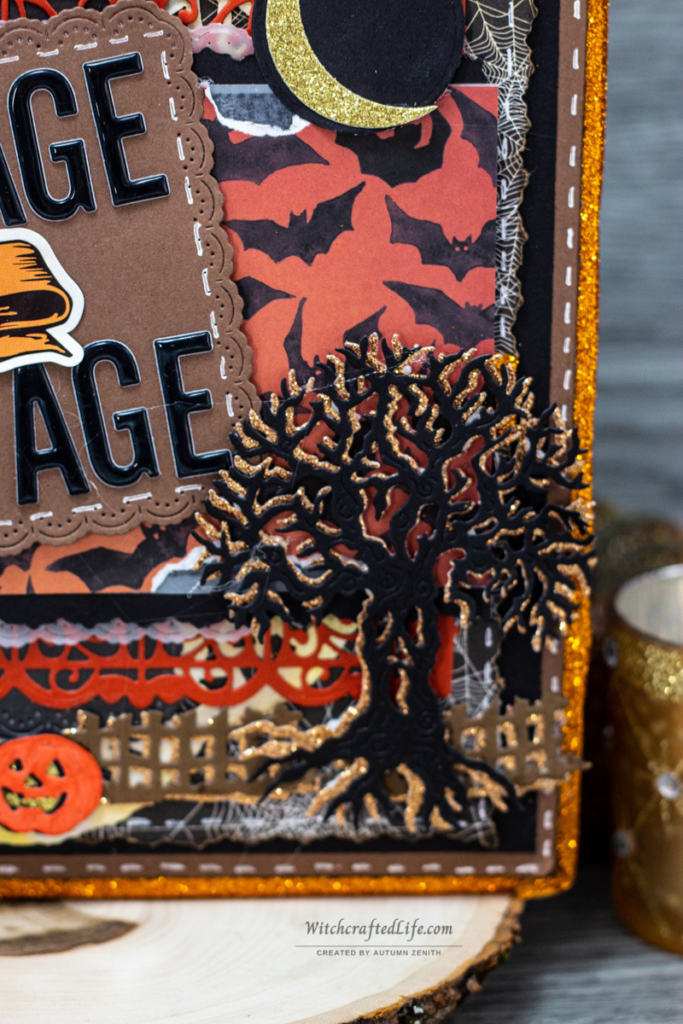
Position the layers slightly off-centre so that both are visible. Adhere together and then to the lower portion of the sign (haunted house on the left side, spooky Halloween tree on the right).
Die cut three cute jack-o-lanterns from orange cardstock and three of the same sized pumpkins from black cardstock.
Use the dark orange coloured ink to highlight the edges and ridges of the orange pumpkin pieces. Position the two layers of pumpkins slightly off-center and adhere together.
Position and adhere small scrap pieces of gold glitter cardstock behind the faces of the jack-o-lanterns to give them the appearance of being lit from within.
Die cut a witch’s hat from black cardstock and likewise back it with a wee piece of gold glitter cardstock. Adhere together and then adhere the completed hat onto the head of the middle jack-o-lantern.
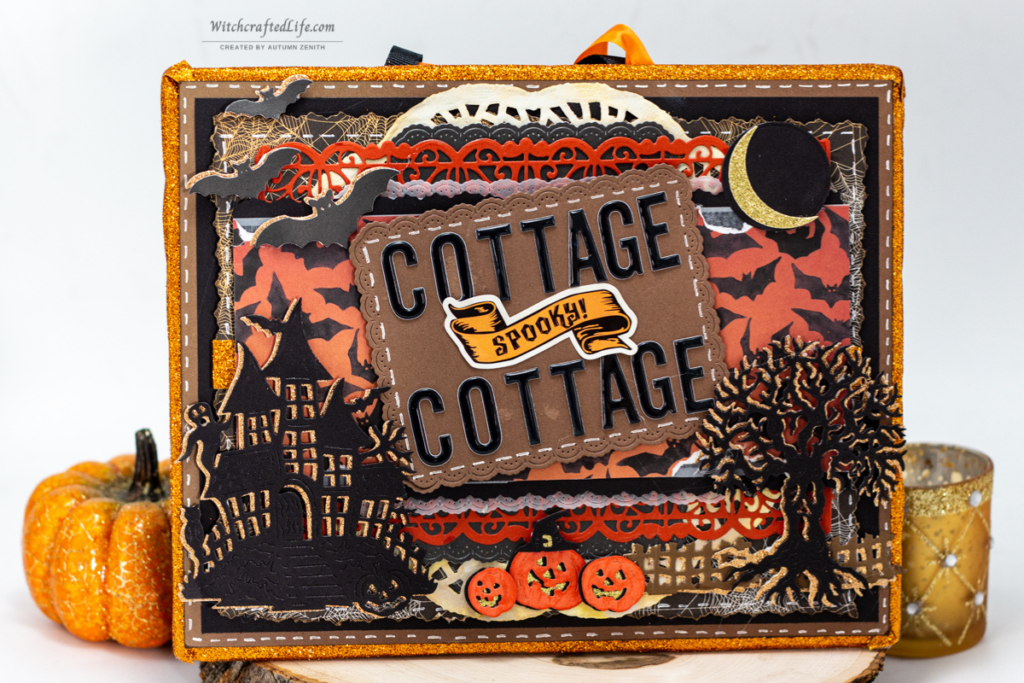
The front of this delightful Halloween hanging wall sign is now complete.
For the backside, cut three (or more, as you wish) pieces of ribbon, seam binding, lace or trim in similar colours as those used throughout this project.
Adhere these pieces together near their ends (a stapler actually works great for this, but a strong adhesive can just as easily be used) and position those ends at least 2 – 3 inches down the center of the sign on the backside.
Once you are happy with the length of the ribbon/trim layers and where they’re positioned on the back, adhere them in place to the cardboard base layer.
Lastly, cut and adhere a piece of brown or black cardstock to the entire back (minus the orange glitter tape edges) so that the ends of the ribbon/trim are concealed beneath the cardstock piece.
Alternatively, place the brown or black cardstock down first, then adhere the ribbon/trim as described above and either leave the ends visible on the back or die cut a suitably shaped piece (oval, rectangle, etc) from cardstock to place over the ends.
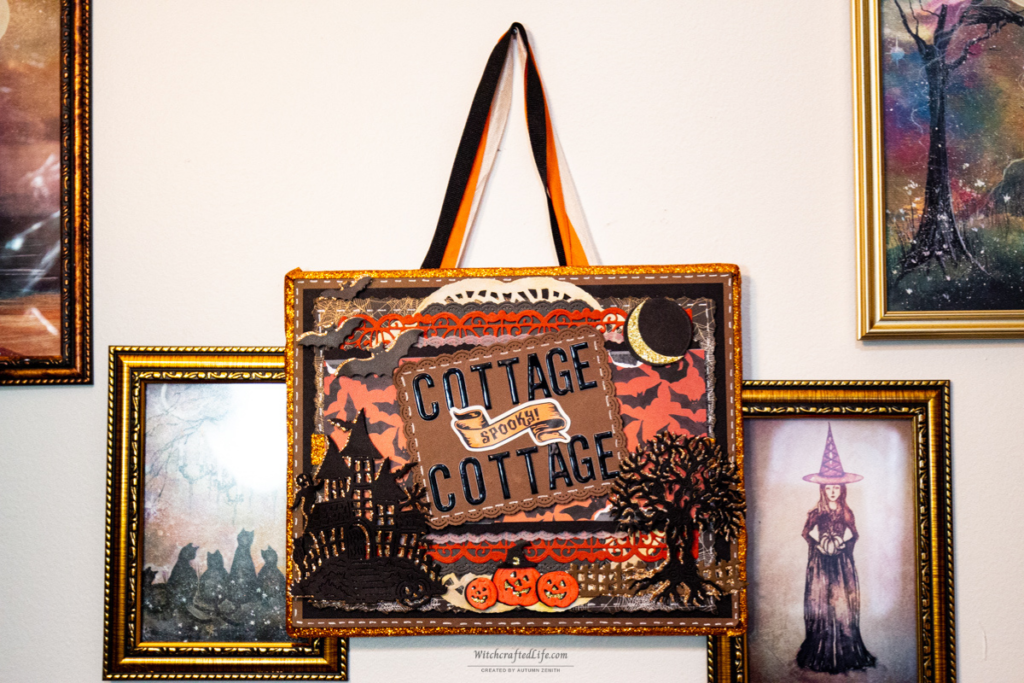
And there you have it, my dears, sweetly spooky, fabulously festive Halloween hanging wall sign to keep and use as part of your own fall (or year-round) décor or to give to someone special in your life so that they can do the same.
If you do not wish to make this project into a hanging wall sign, you could use a small painter’s canvas instead and hang the completed project from a nail or suitable hook on the wall instead.
And another idea would be to create this same sort of design so that it fits within the dimensions of a shadow box frame (which, assuming the frame had glass in it, would keep this project extra safe and protected from whatever life may through at it).
Sweet, spooky, and endlessly inspiring
As Lindsay and Jonas themselves discussed in their recent YouTube video, Ups and Downs of Cottage Life, residing in a modest-sized cottage – much like just about any type of home – is not always an endless parade of sunshine and roses.
However, it can be a wonderful, rewarding, creativity sparking and very meaningful experience that if one is blessed to have the opportunity to experience, may well be worth embarking on.
I have no idea if I will ever get to live in one of my dream homes (to date, the closest I have come is when, for a few years during my childhood, my family lived in a sweet little two-story Edwardian house that was built in 1909).
Whether that comes to fruition or not, I will continue to be inspired on countless fronts by the homes whose architectural and/or interior design styles speak most powerfully to my heart.
Unquestionably, that of Lindsay and Jonas’s house will continue to inspire and resonate with me for the rest of my days – no matter if they move on from it at some point or not, as everything they have shared online about their enchanting cemetery cottage will continue to resonate with me for ages.
These two lovely people embrace and embody not just things such as cottagecore, but also slow living, a deep love of and respect for the past, and the ability to decorate a home of any just about size in the ways that presently bring your soul abundant happiness.
Both they and their house epitomize the “Cottage Spooky Cottage” aesthetic and mindset, and it was my honour to be able to contribute a handmade piece of paper crafting home décor art to their super charming home.
Do you – or have you ever – lived(d) in one of your own dream homes? What kinds of wall hanging sign would most capture the spirit of your current abode? 🦇🤎🎃
Oh my Autumn, this is just fabulous! I love all of the gorgeous depth and dimension and all of the great detail! I love the little touch of glitter too! I’m a big fan of older architecture too and have an affinity for older Craftsman style homes. My house is a 1917 Craftsman and I love the details on the inside.
Sweet Celeste, you are exceedingly kind. Thank you very much for warming my (usually cold for mid-April) evening with your heart-touching compliments about this festive fall time sign.
I must say, it stands as one of my favourite paper crafting projects of any type that I have made to date and I couldn’t be happier to have sent it off to two such lovely people.
My heart skipped more than a few beats upon reading that you live in a 19100s craftsman home. As touched on in this post, calling a house from the 1800s or early 1900s my (our) own would be the epitome of a dream come true for me.
I don’t foresee it coming to fruition anytime soon, but you just never know in life and I hold out plenty of hope that it will be able to happen for us one day (naturally, I would be every bit as much on board with a house that was even older than that, but there are literally none in Western Canada and relatively few still standing to this day in Eastern Canada, so that seems rather unlikely to happen here on Canadian soil – again though, you never know!).
Many heartfelt thanks again, my friend. May the second half of the month smile warmly on you around the clock.
🖤 Autumn
The gorgeous warm colours contrast perfectly with the black spooky elements in your Halloween wall hanging. What a beautifully designed project.
You are blush-inducingly kind, dear Meg. Thank you very much!
I adored making this festive project for my sweet friends and must say, it sincerely stands as one of my favourites I have ever created.
You know that feeling when you are completely “in the flow”, so to speak, of creating? I was riding a huge wave of that the day I made this delightful Halloween wall hanging and know that helped it all the more to turn out as (humbly) nicely as it did. 🥰
Hard to believe – but at the same time, delightfully for me – that Halloween is little more than half a year away at this point. I don’t want the next few months to necessarily zip by faster than Superman (especially after another characteristically long, cold Canadian winter), but I will certainly be preparing and crafting for October all the more over the next few months and am so looking forward to that.
Many thanks again, lovely lady. I hope that you have a relaxing, beautiful second half of April.
🖤 Autumn
Oh such an awesome spook-a-licious decor piece, Autumn! LOVE your added details with the touches of sparkle everywhere!
The layers make perfect dimension and it’s such a treat for anyone to hang in their home!
I have an older Craftsman-style home. I am very attracted to the older homes as they seem to have more character and special little unique gems about them! Always fun to explore them especially haunted ones!
Hello my dear friend, oooohhh you lucky duck, you! What I wouldn’t give to live in an older craftsman-style home. My heart smiles with joy for you that you get the chance precisely that. Should you ever wish to share snap of your beautiful house with me, I would love to see them (I’d offer to reciprocate, but as our abode is a small, nondescript late 1970s build, I doubt you would find it too interesting 😄).
Thank you so much for your wonderfully kind words about this charming All Hallows’ Eve wall hanging. I had a huge blast creating it and must say, it now stands as one of my all-time favourite home decor pieces that I have ever made.
I hope that you are doing well and that spring is returning on your end. It is finally starting to break out here – though the nights are still tending to drop below freezing. Burr! 🥶
🖤 Autumn
I’ve always been drawn to cottages too, Autumn, which is why we have called our humble abode – a terraced 1930s house – Dove Cottage!
I’m loving your attention to detail, which once again is apparent in this multi-layered spooky wall hanging! xxx
Thank you deeply, dearest Ann. You are immensely fortunate to live in a cottage all your own. I adore how cottages remain at least somewhat commonplace to this day in a wide array of European locations.
Though we did not have the joy of living in one ourselves, I was delighted to no end in seeing many a gorgeous cottage (some with traditional thatched roofs even) way back when we were living in Ireland.
I would be honoured at any time to make you and Jos a hanging wall sign (or another type of paper crafting project) for Dove Cottage, if you wish. It would 100% be a gift, of course. Just zip me an email directly or through my contact page here and we can chat about the details.
Sunny hugs & cheerful wishes for the second half of the month,
🖤 Autumn
I love cottage everything! This is perfect. We call our home Anam Cara which means soul friend. I hope each person can make their home their soul friend! This is such a lovely wall hanging.
Thank you abundantly, dear Kmarie. What an enchantingly beautiful name to give your own home. Despite having a life-long penchant for naming things in general, I have rarely given the houses I have lived in monikers of their own. Part of me wonders, in reflecting on the subject, if that is because of how many times (more than twenty) I have moved in my life and thus, I have often not had long to bond deeply with a given home.
Mind you, we have been at our current residence for a touch over four years at this point (making it one of the longest spells to date for me at any home I have ever lived in), so perhaps it’s time I/we came up with a name for it. Given that it was built in the late 1970s, perhaps its name could reference something from that era?
Thank you sweetly for your wonderfully kind words about this festive fall time wall hanging. It was an absolute joy to create and now stands as one of my very favourite paper crafting projects that I have ever made.
Warm hugs & abundant April blessings coming your way,
🖤 Autumn
Gorgeous! I made a Home Spooky Home embroidery with Baba Yaga’s house!
Too cool! What a terrific saying to partner with such a classic element of European folklore and spirituality. If you would ever like to share snaps of it with me, I would be all eyes!
Thank you very much for your super sweet words about this Halloween wall hanging – as well as for each and every blog comment you have blessed me with in recent months. They are always greatly appreciated and never taken for granted.
Many hugs & the loveliest of Beltane season wishes coming your way,
🖤 Autumn
Such a beautiful decoration for your friends, so many fabulous details and dimension Autumn! You pick up a new detail each time you look at it. A fabulous gift!
You are sweeter than all the Easter candy sold this month, dear Donna. Thank you very much for your wonderfully kind words about this festive project.
I had the best time making it and must say, it now stands amongst my all-time favourite papercrafting projects that I have made to date.
Sending abundant hugs & the sunniest of April wishes your way,
🖤 Autumn
This hanging sign is stunningly spooky gorgeous, Autumn!
Of course, I love the theme and the individual pieces, but my favorites have to be the die cut tree and haunted house. I love that you cut both in black and again in copper. That really adds depth to each one. Beautiful!!!
Thank you wholeheartedly, my cherished friend. Your kindness and support mean a tremendous amount to me.
Excitingly, the return of our beloved autumn is now less than half a year away and while I am not per se rushing the intervening months along, it does make my heart sing with joy to know we are closer to that point than further away from it once again.
Right here and now though, spring is slowly continuing to inch its way out in our wee corner of Canada. The lanky, elegant birches in our backyard have their first buds of the season and nary a snowflake has fallen in around three weeks, so we *might* be done and over with winter for another year. How about on your end?
Many heartfelt thanks again & coupled with my deepest wishes for a serene and beautiful April coming your way.
🖤 Autumn
*PS* You have been in my heart and thoughts unceasingly lately.
What a fabulous wall hanging. I love the sparkly orange edging and the orange highlights and in particular the way you have created the lighted house effect with the gold sparkle die cut on the house and the tree. It all hangs together beautifully. Even though there are many layers they all work in harmony. I am sure your friends just love it xx
What a splendidly kind assessment of this festive fall time project, dear Hilary. Thank you very much for your lovely words and the way in which they help to bolster my creativity all the more.
I had the best time making this Halloween wall hanging and must say, it now comes in as one of my all-time favourite paper crafting projects that I have ever made.
Thinking of you and sending the sweetest + cheeriest of April wishes your way.
🖤 Autumn
That is such an inspired gift for your friends (I just got lost reading their blog!), Autumn! I love the spooky vibe and the grand size of it! What a cool hanging!
*Blush!* Thank you SO much, sweet Sheila. You know when you become deeply immersed in a wave of creativity? One of those babies washed over me the day I made this project and I have no doubt that it helped this festive Halloween wall hanging to turn out as (humbly) nicely as it did.
I am tickled pink to have been able to introduce you to Lindsay and Jonas’s gorgeous blog. I actually did not tell them beforehand that I would be penning this post, so I really hope they don’t mind that I put them + their site at the heart of it.
Big thanks again & the very sunniest of April wishes coming your way,
🖤 Autumn
What a wonderful and masterfully created wall hanging! The details are just amazing and it was clearly made with a lot of love. I can only imagine the thought and time that went into creating this, but it turned out fantastic! Well done!
Sweet Carol, thank you tremendously for your heart-touchingly kind and supportive words about this festive Halloween wall hanging.
I was fortunate to be 110% in the creative groove, so to speak, the day I made this charming project and am certain that helped it to turn out as well (humbly) as it did in the end. Making this project also reminded me to craft beyond “just” cards, scrapbook pages, and tags a bit more often than I usually have in recent years (to that end I have not one, but two “off the page” WIPs on the go at the moment).
Thank you again deeply, my friend. May this spring be as lovely to you as you always are to me and my blog.
🖤 Autumn
What a gorgeous Halloween card. You’re always so creative.
Thank you deeply, dear Ivana. The same statement applies in spades to you and your gorgeous work as well.
Work which, I must admit, I am rather behind on at the moment. My health continues to worsen and in turn, I am finding it harder and harder to get online much anymore. The few brief hours a month that such is managing to happen usually go mostly towards medical research and creating content here for this site. That said, I am still trying to visit other peoples’ sites periodically and am planning to hop on over to yours again very soon.
Big hugs & the sweetest of wishes for a serene April,
🖤 Autumn
Stunning creation. love the layers of interest you put in all your creations.
Thank you with a very touched and appreciative heart, dear Anesha. Your kindness never fails to brighten my week.
I had the best time creating this festive project and must say, it now stands as one of my very favourite papercrafting creations that I have made to date.
I hope that your April is going positively and that you have a terrific second half of the month.
🖤 Autumn
This is SO lovely, perfectly Halloween to me! ♥
That is an absolutely awesome – and very encouraging compliment – my fellow October 31st adoring friend. Thank you tremendously! 🙏🎃🖤
Here’s to the next five months as we gleefully count down the days until All Hallows’ Eve returns again.
🖤 Autumn